How to design your own Amigurumi
By knotorious.loops·
Want to finally design your own crochet plushies?
Writing your own amigurumi patterns is kinda like being a mad yarn scientist—you’ve got your hook, your yarn, and absolutely no rules. Wanna make a frog with a mustache? Go for it. A cat with sunglasses and tiny sneakers? Why not. It’s fun because you’re not stuck following someone else’s blueprint—you’re just vibing with stitches and seeing what happens. Sometimes it turns out cute, sometimes it looks like it’s seen things, but either way, it’s yours. Plus, you start to get a better feel for how shapes work, which makes you feel weirdly powerful. And hey, if you ever write it down, someone else might make your funky little goblin too. That’s wild.
Step by step guide
Come up with an idea
Think of what you want to make — could be an animal, some popular character, a snack with a face, or something super cool you don't even know yet exists, whatever you vibin' with. Don't stress if it’s weird. Weird is good. In fact, the weirder, the better. There is a lot of basic Bee and Jellyfish patterns out there already.Make a sketch & break it into shapes
No need to sweat it if you not good at drawing (like myself). We just need a bad, maybe even very bad sketch here. Try drawing a simple front view and side view. This is needed to determine the different shapes your characters is made up of and how all of them fit together. Most Amigurumi are just a couple of basic 3D shapes sewn together:- Head = sphere or oval
- Body = tube, egg, or ball
- Arms/legs = tubes
- Ears/tails/hats/etc = triangles, cones, or custom little blobs
Slice up piece by piece
Now comes the most important part. Slice up each shape in equally tall segments (around what you would imagine a single round of crochet be) parts, just as if it was in a CAT scan, and draw those lines on your sketch also. Each of these segments will end up 1 round of your crochet pattern. Looking at the shape from the bottom, up for each segment you need to determine if the size of the segment stays the same compared to the previous one, or changes in size. Read on to learn which stitches you will have to use for which type of situation to get the shape you want. Immediately crochet every round as you have come up with it and check whether it aligns with you had pictured it in advance. If not, it's frogging time and time to adjust and try again. Do not forget to stuff your pieces and check again whether the shape still aligns with your imagination, even being filled. Write everything down as you go — future you will thank you. Even if it’s just “row 6: added 3 extra stitches bc it was looking flat.” These notes become your pattern later if you want to repeat or share it.NEVER DO NOT WRITE DOWN WHAT YOU DID! Trust me on that one. Repeat this process for every piece until you end up with a favorable result for each.Assemble your draft & optimize
Sew all of your pieces together (use sewing pins to get the positioning right) and check the vibe of your creation. Check again if all dimensions look good even in comparison to the rest of your Amigurumi. Potentially adapt your pattern notes where things have to be a bit wider, narrower, longer, shorter or whatever and crochet another draft based on your updated pattern. Repeat this process until you find nothing in your plushie you would change anymore. Also don't forget to embroider faces, add accessories or give it eyes, just all the stuff that cannot be crocheted. Don't be afraid to think outside the box here, as this is where the personality of your Amigurumi really starts poppin' out.Finishing up the Pattern
When you like your result and want a crochet pattern out of your notes, you will have to transpose your notes into the actual format how crochet patterns are written, including all control mechanisms such as round numbers and stitch counts for every round. The hard frogg's life crochet pattern maker can help you a lot with this process. Not sure how to do that? Check out our guide on how to write crochet patterns for all the details. When you are done with this, you should once more try out the pattern yourself by crocheting another Plushie off of it before potentially searching for pattern testers to have your design peer-reviewed. Make final adjustments based on your final test and the feedback of your testers.Name it. Love it. Maybe even share it.
Congrats! You birthed the blueprint of a yarn creature. Give them a name like “Wiggles” or “Sir Lumpington” and show them off.
Your basic building blocks
Most, and by most I mean easily 90% of every Amigurumi is an assortment of the following 3 types of crochet stitches:
- single crochet stitch (sc) - this is just the most basic stitch, actually just putting another stitch on top of a pre-existing stitch in the previous round. This also the stitch you will do most of when creating Amigurumi, trust me
- increase (inc) - this just basically means putting 2 single crochet stitches into the same stitch of the previous round, hence your crochet piece as well as its current stitch count do Increase.
- decrease (dec) - this is the complement to the increase stitch — it takes 2 stitches from the previous round and makes 1 out of them. This makes your current shape and its stitch count, you guessed it, Decrease.
Making your crochet pattern design life easier with hard frogg's life
Coming up with the shapes is one piece of the big puzzle of designing crochet patterns and Amigurumi. Another essential part is adding control elements such as stitch counts and verifying if your pattern actually makes sense and all your stitches add up. This is where the hard frogg's life crochet pattern maker will save you tons of time (and nerves)!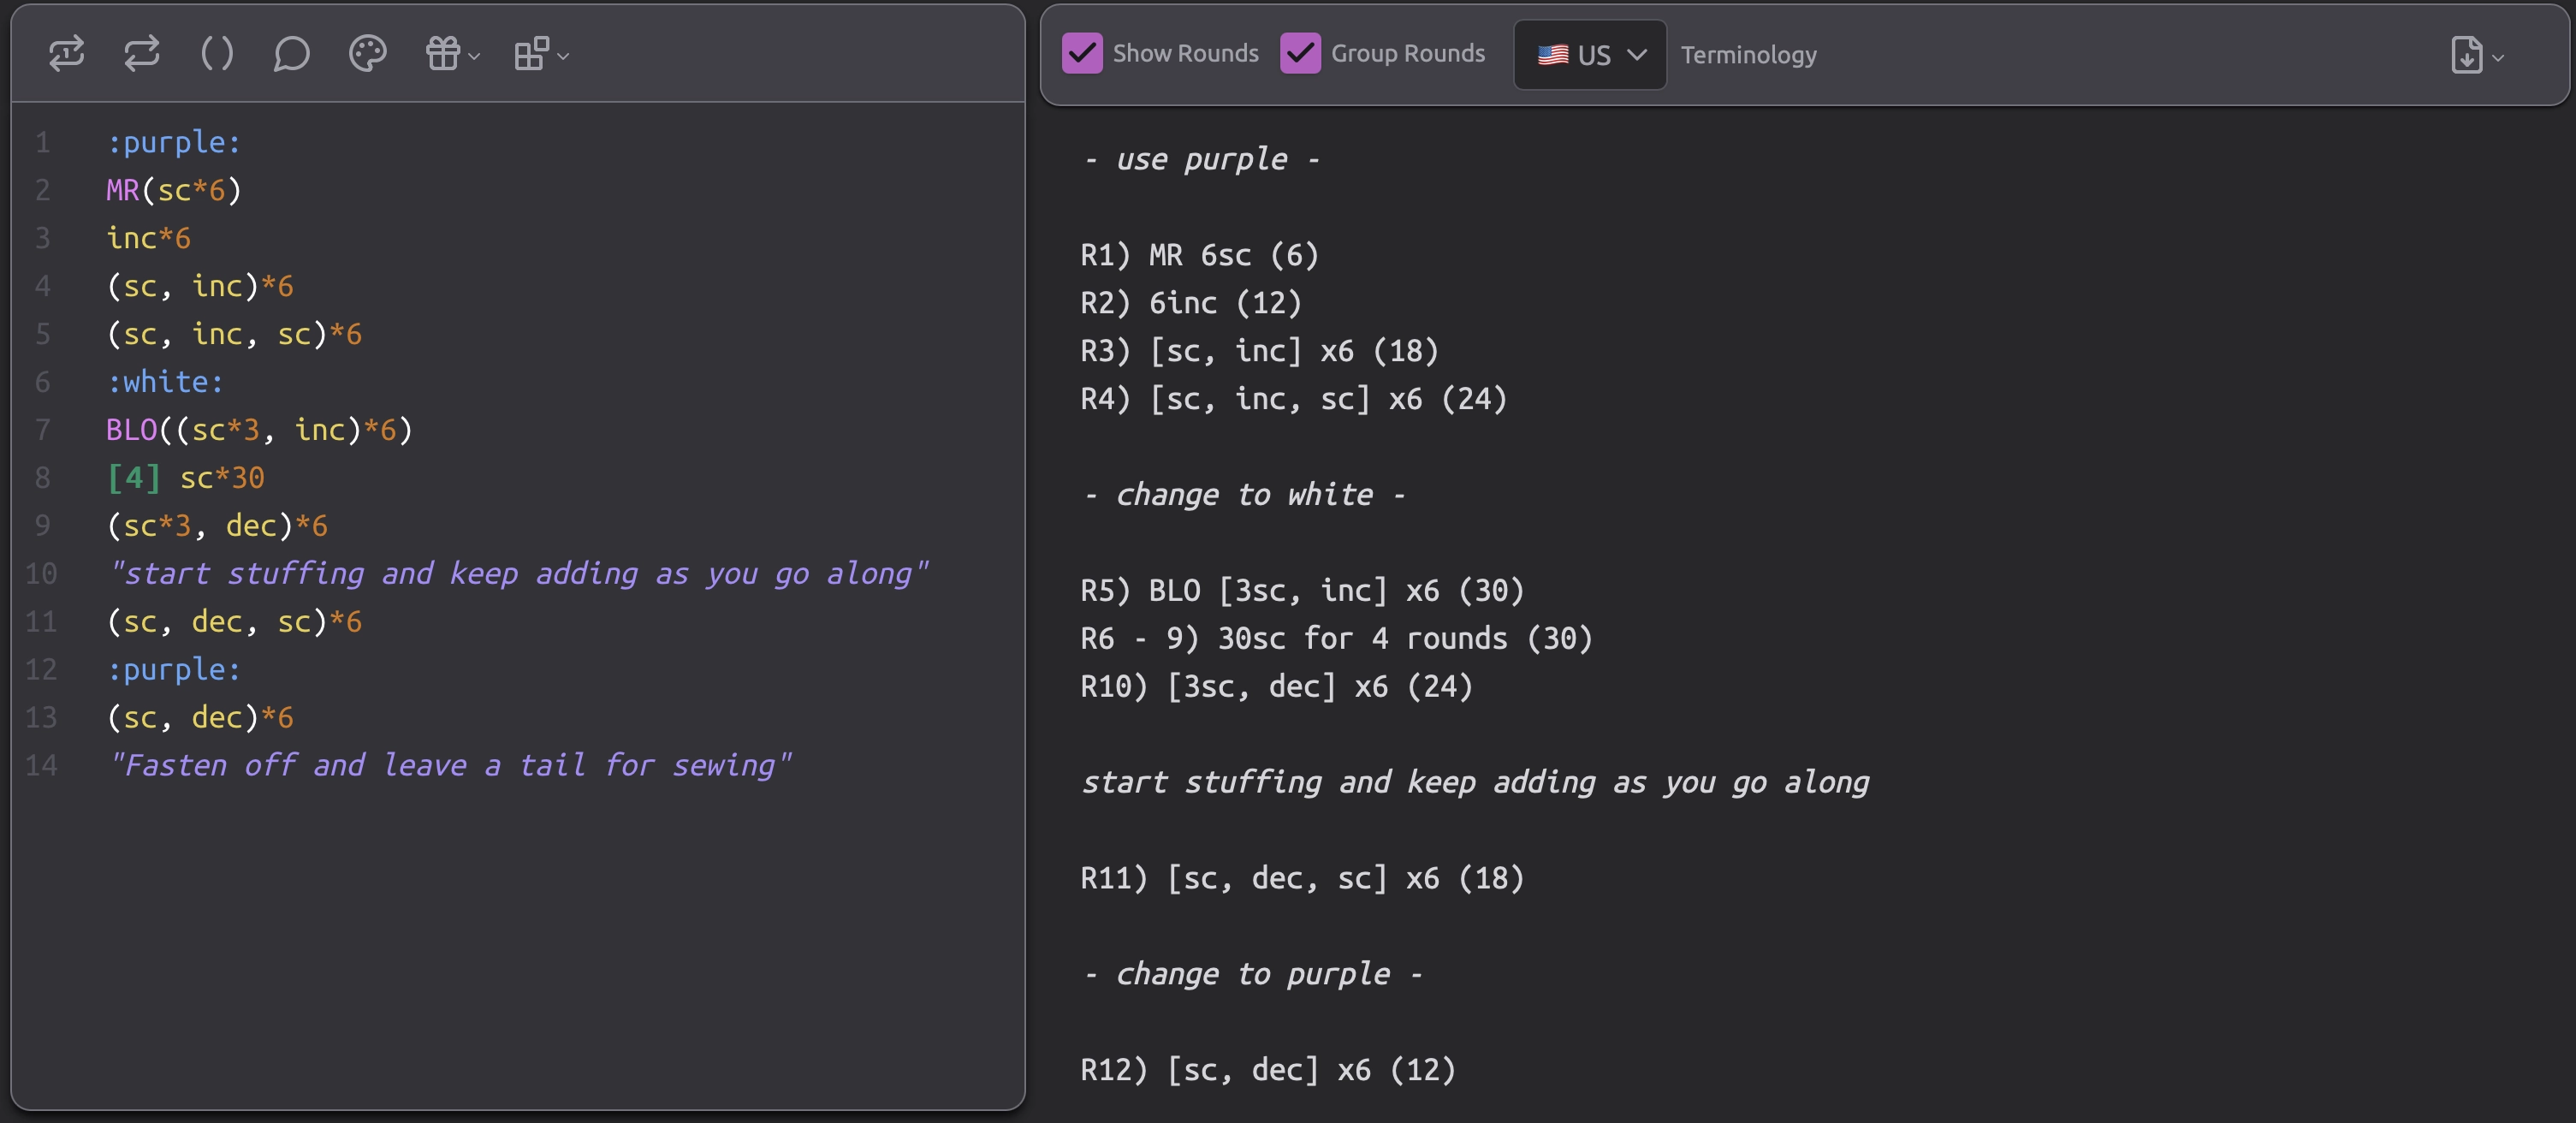 The editor will not only auto generate all your stitch counts and row/round numbers for you (meaning you will never have to up all round numbers after inserting another round later on). It will also check whether you have actually cared for & used all stitches of the previous round with each round. This exponentially reduces the risk of errors in your crochet patterns and reduces the effort for mundane tasks such as checking stitch counts and adding round numbers.The hard frogg's life crochet pattern maker also answers the question: "where do I put my pattern notes to not lose 'em?" You basically have your own lil' design buddy (in frog shape) with you that you feed with all your notes, update them and BAAM you got a crochet pattern in front of you.
The editor will not only auto generate all your stitch counts and row/round numbers for you (meaning you will never have to up all round numbers after inserting another round later on). It will also check whether you have actually cared for & used all stitches of the previous round with each round. This exponentially reduces the risk of errors in your crochet patterns and reduces the effort for mundane tasks such as checking stitch counts and adding round numbers.The hard frogg's life crochet pattern maker also answers the question: "where do I put my pattern notes to not lose 'em?" You basically have your own lil' design buddy (in frog shape) with you that you feed with all your notes, update them and BAAM you got a crochet pattern in front of you.
Related Guides
- How to Write Crochet PatternsReady to turn your crochet creations into actual patterns other people can follow? Here's how to write crochet patterns that make sense!
- What Are Crochet Pattern Tests?You've written a crochet pattern — amazing! But before you share it with the world, you need pattern testers. Here's why and how.
- US vs UK Crochet TerminologyUS and UK crochet terms use the same words for different stitches. Here's the complete side-by-side translation guide.
- Why You Need a Dedicated Crochet Pattern MakerGoogle Docs, Word, Canva — none of them were built for crochet patterns. Here's why a dedicated editor is not a luxury, it's a necessity.
- Exporting Crochet Patterns as MarkdownYour pattern lives in the editor — markdown is just one export format. Here's why it's the perfect choice for embedding patterns on blogs and websites.
- Pattern Maker User DocumentationNot sure where to start on your crochet pattern maker journey? Peep some of the user documentation and become a master in no time.